|
 |
|
|
|
|
|
|
|
|
Please follow power diagram in the manual for each interface.
For One-Touch Backup (OTB) function, please see manual
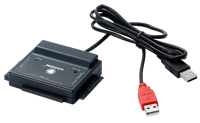
Note: OTB function can only backup data files; anything on program files will not be found or supported. | | | 3.5” IDE Hard Drive | | | 1. | 1. For IDE / PATA hard drives, set hard drive to Master jumper settings. Master jumper settings should be located on main hard drive label. | |  | | 2. | Attach hard drive to the unit. | | 3. | Interface Connections: - For desktops, plug USB cable directly into the port located at the rear of your PC.
- For notebooks, plug USB cable into any ports located on the notebook.
- Please refrain from using external USB hubs or other USB ports (for PCs).
| | 4. | Plug the power adaptor into the unit and turn it on; make sure the hard drive has vibrations. | | 5. | Windows will pre-install drivers automatically. | | 6. | Make sure hard drive is partitioned / formatted through disk management (for new drives). | | 7. | Older hard drives, please verify under disk management that your drive is partitioned / formatted. You may need to assign a new drive letter manually. | | Note: Notebook or desktop units from proprietary companies like Compaq, Dell, HP, etc. may have security features that blocks detection of the drive when installed to other units or enclosures. |
|
For 3.5” SATA Hard Drive | | | 1. | Attach hard drive to the unit. | | 2. | For desktops, plug (1) one USB connector directly into the port located at the rear of your PC.
For notebooks, plug (1) one USB connector into any ports located on the notebook.
Refrain from using external USB hubs or other USB ports (for PCs). | | 3. | Plug the power adaptor into the unit and turn it on. Make sure the hard drive has vibrations. | | 4. | Windows will pre-install drivers automatically. | | 5. | Windows will pre-install drivers automatically. | | 6. | Older hard drives, please verify under disk management that your drive is partitioned / formatted. You may need to assign a new drive letter manually. |
|
2.5” IDE / PATA and SATA Hard Drive | | | 1. | Attach hard drive to the unit. | | 2. | - For desktops, please use the Y-USB cable and connect both (2) USB into the port located at the rear of your PC; connect the other USB to the unit.
- For notebooks, please use the Y-USB cable and connect both (2) USB into the port of your notebook. Connect the other USB to the unit.
- Please refrain from using external USB hubs or other case USB ports (for PCs).
| | 3. | Windows will detect and pre-install drivers automatically. | | 4. | Make sure hard drive is partitioned / formatted through disk management (for new drives). | | 5. | Older hard drives, please verify under disk management that your drive is partitioned / formatted. You may need to assign a new drive letter manually. |
|
|
|
| |
|

|
|
关于我们 | 联络我们 | 网站地图

|
|
© 2012 CoolMax Technology Inc. All Rights Reserved. |
|
|


 中国
中国